Click on Admin | Settings.
Select Manage Users.
![]()
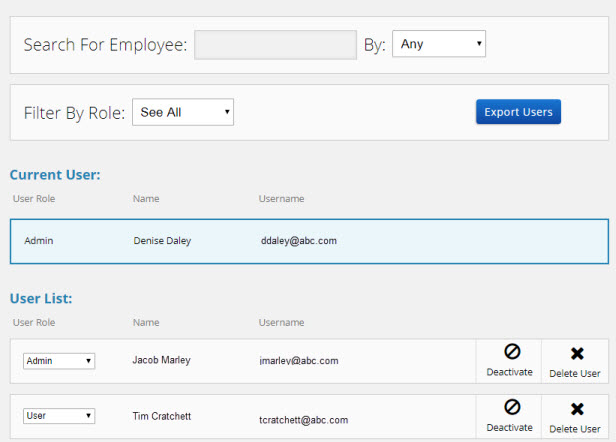
The Manage Users screen displays.

The Manage Users option available under Admin | Settings is where you:
Manage user invites
Update a user's role and access to Admin or User
Search for a user account
Export a list of all users to Excel
Delete or deactivate a user account
Add users prior to launching an individual site.
Click on Admin | Settings.
Select Manage Users.
![]()
The Manage Users screen displays.

From this screen you can:
Search for Employee – Enter any part of the name and choose to search by any name, user name, first name or last name.
Filter By Role – Filter the user list by role; choose from Super Admin, Admin, and User.
Export Users – Click this button to export a list of all user accounts. The excel file includes the user name, email, postal code, registration date and last login date.
Edit the User Role - You can edit user’s role and access rights to be either Admin or User. Click on the User Role drop-down arrow for the user and select the role. You are prompted to confirm the role, click Confirm.
Deactivate – Click Deactivate to deactivate the user; the user account is still in the system but the user is unable to access the site.
Delete User -- Click Delete User to delete a user; removes the user account from the site.
For individual sites that are not launched, you add users through the Manage Users tool.
Until the site is launched, you are limited to six (6) regular users and can have unlimited Admin users.
Select Settings | Manage Users from the Admin Dashboard.
Click Add User.
Enter the user’s Email address.
Enter the user’s First Name.
Enter the user’s Last Name.
Click Add. The user is added and displays in the User List.
Note: Select Admin from the User Role drop-down to change the individual from a user to an Admin.
When you invite a user, the invite displays in the Open Invitations list until accepted.

From this list you can:
Note: Until launched, you are limited to six (6) users – this count includes all users (non-admin) in the User List and all valid open invites.